You have no items in your shopping cart.







The following is a step by step guide to customising your Akiraka logo image by replacing the logo text with your own organisation or company's name and logo.
[span class=attention]In order to utilise the Fireworks Source PNG included with the akiraka template release, you will need Adobe Fireworks. The 30-day free trial of this software as well as more information is available here at the Adobe website.[/span] [video url="/feb09/video/logo.mov" title="Logo Editing Video Tutorial" img="images/stories/logo-editing-video.jpg" header="Logo Editing Video Tutorial" label="Watch Now!" vwidth="450" vheight="318"]Learn how to customise your Akiraka logo using Adobe Fireworks with this detailed video tutorial.[/video] [clear]One of the first steps of customising your new Akiraka template will undoubtedly be altering the logo text to reflect the name of your company / organisation. RocketTheme makes this process a simple one by including both the Source PNG for the template, as well as the font(s) used.
The most effective way to customise the logo is to use the included Source PNG file. When opened in Adobe Fireworks, this file contains all of the Layers in the design allowing you to tweak and change any of the image elements of the template design. The following steps will help you quickly get your new logo ready to go:
Step 1
First, open the akiraka-logo-source.png file in Adobe Fireworks. On the right side, you will notice a taskbar named Layers. Inside this column, a list of elements within the source will appear, divided into folders. The first is Web Layers which controls the green slices on the page that are used to export the images. Click the eye which is immediately left to the folder name Web Layers to make it invisible. This allows use to edit the logo.
Step 2
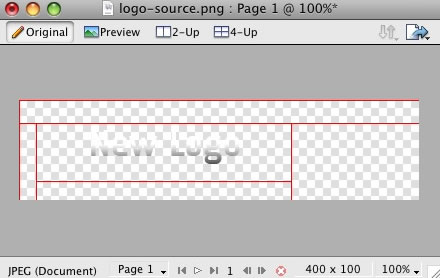
Next, double click on the logo. This will activate the text tool so you can edit the element. Highlight the entire text box with your cursor and type your text instead(such as your company name.)

You will also notice the Japanese style image to the left of logo. Select these and change them if you so desire. In this guide, we shall delete it.

Step 3
Next, reactivate the Web Layers slice. As you did in the initial step, select the eye icon to make it visible and subsequently making the slices visible on the canvas. Select the logo slice, either on the canvas itself or in the Web Layers folder. If you find the slice is too small, hover your cursor the blue points around the slice and drag it to a new size.
Step 4
To export your logo, right click on the green slice that is situated above your new logo. A popup menu should appear with numerous options. The value we want to deal with is "Export Selected Slice...". As the name suggests, this option will export/save this slice only out of the entire source window.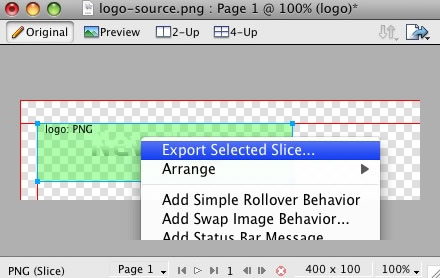
Step 5
If you are new to Fireworks, you may be wondering why it appears that there is only one style variation in the source. This is not the case as we take advantage of the Frame features of Fireworks. You need to simply switch frames to see all the other style variation sources.There are a few ways to change frames and we will show 2 methods that you can use.
In the right column where you find the Layers toolbar including the Web Layers area, you should see another tab/toolbar named Frames. Just left click on the title Frames to enter the frames area. Then you can click on either of the frames which are named to show which style variant is on that particular frame.

The second method is the most easiest and simplistic. At the bottom of the Fireworks canvas is a row of buttons, arrows just as previous and next. Select the arrows to switch between frames.
 [span class=attention]By default, the source should set the export file format to PNG32. If this is not the case, you will need to change your Fireworks export settings. Firstly, expand the Optimise & Align taskbar in the upper right of Fireworks. From the available dropdowns, select PNG32.[/span]
Step 6
Once you have successfully edited then exported your new logo, you will need to upload it to your server. This process is best done via a FTP client such as Filezilla- Open your FTP client on your local computer.
- Login to your web server where Akiraka is installed.
- Navigate to the /templates/rt_akiraka_j15/images/body directory.
- Upload logo.png (and any other logo related images) to this directory (You may need to browse on the local panel in the FTP client to find where you have exported your logo).
- Clear your browser cache before viewing such as using the keyboard commands on Windows, Ctrl+F5.
Publié dans
Demo Pages
A guide to the basic Akiraka customisation options that can be configured in the template manager
The names of the various selections denote the area that they apply to. [span class=alert]Click the Custom Styles button in the toolbar to output your custom style configuration into the Custom Config output box, underneath all the params. You will use these values in the styles.php file to customise your own defaults[/span]
Preset Style
The template is bundled with 10 pre-made style variants that be be easily and quickly chosen from the template configuration. There is also an option for Custom which you will choose if you do not wish to use the preset styles. [span class=attention]NOTE: The Header Color ... Footer Link options will not work unless you click Custom in the Preset Styles section.[/span]Colour Chooser Options
If you selected Custom in the Preset Styles option, you will now have a choice of 27 options to customise your sites colour scheme. The options are divided in 3 areas, the name, such as Header Color; an input field with a HEX colour value, such as #fff; and a colour palette box, which, on click, will show a visual colour chooser. Therefore, you can either manually type your desired colour into the input field or select the colour from the popup. The changes will appear live in the preview above all the selections.The names of the various selections denote the area that they apply to. [span class=alert]Click the Custom Styles button in the toolbar to output your custom style configuration into the Custom Config output box, underneath all the params. You will use these values in the styles.php file to customise your own defaults[/span]
Overlay Textures
Choose from 5 varying overlaying texture options that will load onto the Akiraka template.Fixed Header
Select whether the header always appears, pinned to the top of your website or not.Fixed Footer
Select whether the footer always appears, pinned to the bottom of your website or not.Display Frontpage Component
This setting allows you to select whether the frontpage area (where content items are placed) is active or not. This is useful if you wish to have an entirely modular frontpage and no article-based content.IE6 Warning
Warn your visitors using Internet Explorer 6 to upgrade to a more secure version with this toggle. This option activates a javascript based dropdown in IE6 at the top of the template where a description of why IE6 is a redundant browser is visible. The warning will only appear once as its stored via a cookie.Font Family
You can choose which font you would like to use for your entire website, these are all web standard fonts.Template Width
This template configuration option allows you to easily change the width of the template itself, simply change the number to another pixel value.LeftColumn Width
This template configuration option allows you to easily change the width of the left column, simply change the number to another pixel value.RightColumn Width
This template configuration option allows you to easily change the width of the right column, simply change the number to another pixel value.Left Inset Width
This template configuration option allows you to easily change the width of the left inset position, simply change the number to another pixel value.Right Inset Width
This template configuration option allows you to easily change the width of the right inset position, simply change the number to another pixel value.Splitmenu Location
One of the template's menu options is splitmenu which displays the first level items in the horizontal menu bar and the 2nd in a side column module. This option allows you to choose between the left column or the right column.Default Font
This option allows you to choose what the font size will be, you have 3 options to choose from, these are small, default and large.Show Main Logo
Choose whether the logo area has the template logo image, or is the logo module position. If this option is set to no and there are no modules assigned to the logo area, it will collapse completely.Show Copyright
Choose whether the copyright area has the RocketTheme logo image, or is the footer module position. If this option is set to no and there are no modules assigned to the footer area, it will collapse completely.Show Font Controls
This setting allows you to disable the text size controls in the upper right of the template.Mootools / Javascript Compatibility
Enable or disable js compatibility mode for better compatibility with non mootools based js libraries. Warning, setting to "true" will cause several js template features to not work properlyMenu Type
Akiraka is bundled with 4 menu options, 3 of which are integrated menu approaches. These are splitmenu, moomenu, suckerfish and module. Splitmenu displays the 1st level menu items in the horizontal bar and the 2nd in the side column; moomenu and suckerfish display the menu items in dropdown lists with moomenu having a javascript powered approach; and the module options turns the menu bar into the toolbar module position so you can insert modules into the area (this will disable the menu however). You can also select none so the entire horizontal menu does not appear.Drop Down Rows per Column
The maximum number of menu item rows per a column. Applicable only to MooMenu and Suckerish, as well as second+ menu levels.Drop Down Columns
The number of columns for a dropdown. Applicable only to MooMenu and Suckerish, as well as second+ menu levels.Multi-Column Level
The menu level that is affected by the multiple column dropdown affect. Set to 0 to affect all dropdown levels or set a number greater than 0 to specify a particular level with the multiple column function. Applicable only to MooMenu and Suckerfish.Menu Name
The following parameter controls which Joomla menu is loaded for the horizontal navigation bar, by default this is mainmenu but you can change it to whatever menu such as othermenu.
Publié dans
Demo Pages
[span class=alert]Note: RokNavMenu is an essential module for the template. It is required for the modules to work so ensure that you install it into Joomla.[/span]
[list class=bullet-1][li]Hover support for IE6 using the sfHover javascript class just like in Suckerfish.[/li] [li]Fully degradable to standard SuckerFish menu if javascript is not supported.[/li] [li]Configurable mouse-out delay to allow for accidental mousing out of the menu.[/li] [li]Completely customizable animation effects using MooTools transitions. Can be configured in X and/or Y directions.[/li] [li]Support for fade-in transparency[/li] [li]Experimental support for IE6 z-index bug using the iFrame hack.[/li][/list] An example configuration as used in the demo:
For example, "Bounce.easeIn or Bounce.easeOut or Bounce.easeInOut" produce a bouncing effect.[/li] [li]BG: This is an added effect with Moomenu that allows a background fade (whether solid colour or image) to appear on hover of the first level Moomenu items so you will have a transition for the first level background and reveal of the second level dropdowns. With this setting, you can decide whether this feature is active as well as define the duration / transition of the moveover and mouseout state (i.e. when you hover over the menu, then move your cursor away).[/li] [li]Submenu: Yet another feature in the new RokMoomenu. This appears add a javascript based hover on the submenu items of Moomenu. You can control all the necessary parts f the javascript effect form transition to duration as well as the hover state.[/li][/list] [span class=attention]For more details with diagrams, visit the Mootools documentation site[/span]
Akiraka features an array of elegant, professional and exclusive menu systems. Here you can read an overview of the Akiraka menu configuration options.
[span class=attention] Video Tutorial Currently Available! Launch the Joomla Menu Setup Video Tutorial now![/span]Selecting your Menu Style
Akiraka allows you to choose from 4 menu modes:
[list class=bullet-1][li]RokMooMenu - The advanced menu system based on the ever popular Suckerfish menu style, featuring mootools powered transitions and effects.[/li] [li]Suckerfish - The versatile dropdown menu is an option in combination with RokMooMenu to minimize library conflicts and improve site performance.[/li] [li]SplitMenu - The venerable SplitMenu is a solid choice for navigation. It works by rendering the top-level menu options horizontally, and the submenu/child items are rendered in a module on the side.[/li] [li]No Menu Bar - Setting the menu type to "none" will remove the horizontal menu as well as the menu bar graphics making the header flush with the main content giving you more control over the appearance of your site.[/li][/list]You can designate which menu type you want to use on your site with a single control in the template configuration.
DropColum Menu
A brand new menu function, the Multiple Drop Column ability. This applies only to MooMenu and Suckerfish and allows for multiple drop down columns instead of the typical single variant. The advanced options with this feature, allow you to choose the number of columns, specify individual menu levels which exhibit the behaviour and restrict the number of columns per row. A truly versatile new feature as showcased on this demo.The Powerful & Popular RokMooMenu
This menu has been developed from scratch using the latest and greatest MooTools JavaScript framework. The RokMooMenu is a highly advanced and fully customisable menu system. Some of the great features include:-[list class=bullet-1][li]Hover support for IE6 using the sfHover javascript class just like in Suckerfish.[/li] [li]Fully degradable to standard SuckerFish menu if javascript is not supported.[/li] [li]Configurable mouse-out delay to allow for accidental mousing out of the menu.[/li] [li]Completely customizable animation effects using MooTools transitions. Can be configured in X and/or Y directions.[/li] [li]Support for fade-in transparency[/li] [li]Experimental support for IE6 z-index bug using the iFrame hack.[/li][/list] An example configuration as used in the demo:
Menu Settings
[list class=bullet-1][li]Bgiframe: Can be true or false. Only turn on if you are having problems with IE and z-index. This feature is experimental.[/li] [li]Delay: Defaults to 500ms. This is the how long you can mouse off the menu before it vanishes.[/li] [li]Props: These are the properties that will be applied to the menu. Can be any combination of opacity, width, height. The two properties, width and height are affected by the transition defined in opts.[/li] [li]Duration: The time in ms the animation will run for.[/li] [li]Transitions: Any of the available MooTools transitions. See below for more details.For example, "Bounce.easeIn or Bounce.easeOut or Bounce.easeInOut" produce a bouncing effect.[/li] [li]BG: This is an added effect with Moomenu that allows a background fade (whether solid colour or image) to appear on hover of the first level Moomenu items so you will have a transition for the first level background and reveal of the second level dropdowns. With this setting, you can decide whether this feature is active as well as define the duration / transition of the moveover and mouseout state (i.e. when you hover over the menu, then move your cursor away).[/li] [li]Submenu: Yet another feature in the new RokMoomenu. This appears add a javascript based hover on the submenu items of Moomenu. You can control all the necessary parts f the javascript effect form transition to duration as well as the hover state.[/li][/list] [span class=attention]For more details with diagrams, visit the Mootools documentation site[/span]
Creating the dropdown menu items
To have specific menu items appear as sub items, you must assign them to the specific navigation item in which they will originate from. The following tutorial will show you how simple it is to create your ideal menu system.Step 1 - Navigation
Once you have logged into the Joomla! Administration Area, you must navigate to the Menu area. Hover over the Menu item in the taskbar to show the dropdown menu. For this example, we are going into the mainmenu but the technique is exactly the same for all menus in the Administrative area.Step 2 - The Menu Manager
You will then be transported to the Menu Manager for mainmenu. At this point, you can do two things. The first is to edit an existing menu item, which we will be doing in this tutorial or create a New menu item to be subordinate to an existing item. Click on the item you want to be part of the dropdown menu.Step 3 - Assigning a Parent Item
You can now assign the content item to the mainmenu item in which you want to be in the dropdown menu. Identify the "Parent Item" section of the manager. You will select the item in which you wish to be the parent and the source of the dropdown menu. In this example, we have selected "Home".
Publié dans
Demo Pages
Learn all about the exciting RocketTheme exclusive modules that are included in the Akiraka template release. Here you can find instructions for installation and configuration for each of the custom modules/scripts.
[span class=attention] Video Tutorial Currently Available! Launch the Joomla Template Module Installation Video Tutorial now! (Requires Flash)[/span]Step One: Installing the Module
[list class=bullet-1][li]Download the akiraka-extensions-j15.zip archive from the Akiraka download section of the RocketTheme Joomla! Club. Unzip the archive and inside you will find individual zip files for each of the extensions[/li] [li]Login in to your administrator console on your Joomla! website and navigate to the Extensions menu item, and select Install/Uninstall from the dropdown menu. [/li] [li]In the Upload Package File section, click the Choose File button and select one of the mod_modulename.zip that was inside of the zip file you downloaded earlier. Next click the Upload File & Install button to install the module[/li][/list]Step Two: Publishing the Module
[list class=bullet-1][li]Now the module is installed it must be published in the appropriate module position and configured to suit our needs. From the top menu, select Extensions > Module Manager[/li] [li]This will take you to the Site Module Manager which allows you to configure the placement and configuration of all modules in your Joomla website[/li] [li]Locate the module from the list. Remember there could be a few pages. Once you have found it, you can publish in 2 ways: The first is selecting the cross next to the tile or clicking the title then set Publish to Yes followed by Save[/li][/list] [clear]RokAjaxSearch Module
RokAjaxSearch is a mootools enhanced search module. Simply type a search value into the box, and search results will dynamically appear in a popup allowing you quick access without having to load the search page.We will take a quick look at the parameters you will find when you install this module. There are 4 columns, parameters, options, demo and description. The parameter column lists each available setting for the module; options lists the available options to choose from; demo lists the options chosen on the demo and description outlines what the module does.
Parameter
Show Title
Enabled
Position
Module Class Suffix
Search page URL
Inlcude RokAjaxSaerch CSS
Saerchphrase
Order
Limit
Hide div id(s)
Link to all results
Show Description
Include Category/Section
Show Read More
Demo
No
Yes
search
leave blank
index.php?option=com_search&view=search
Yes
Any Word
Newest First
10
leave blank
Yes
Yes
Yes
Yes
Description
Enable/Disable the module header
Enable/Disable the module
Choose the module position
Add an extra tag to the HTML
Link to the search page
Set No to load template specific CSS
Search parameters
Order of results
Number of results
Specify div IDs to be exempt from search
Link all search results
Show description with results
Include category/section in results
Show read more
RokNavMenu Module
RokNavMenu is now an essential ingredient of the RocketTheme templates. It provides various functions which are above and beyond what the mainmenu, and the subsequent template overrides. Therefore, much more sophisticated menus can be constructed providing you with a much greater degree of usability. It is an essential install for the integrated menu systems to operate.We will take a quick look at the parameters you will find when you install this module. There are 4 columns, parameters, options, demo and description. The parameter column lists each available setting for the module; options lists the available options to choose from; demo lists the options chosen on the demo and description outlines what the module does.
Parameter
Show Title
Enabled
Position
Menu Name
Limit Levels
Start Level
End Level
Always show submenus
Menu Tag ID
Menu Class Suffix
Module Class Suffix
Max Menu Depth
Show Menu Icons
Menu Icon Link
Demo
Yes
Yes
toolbar
mainmenu
No
0
0
No
leave blank
leave blank
leave blank
10
No
No
Description
Enable/Disable the module header
Enable/Disable the module
Position of the module
Menu that is loaded
Limit number of sub-levels
Starting menu level
Ending menu level
Always show submenu items
ID added to the menu code
Class suffix to the menu
Class suffix to the module
Max number of menu levels
Show menu icons
Link menu icons
RokTabs Module
RokTabs, the fully independent and incredible flexible standalone version of the former RokSlide. The module itself is installable into Joomla and can be easier utilised on any template, not just Akiraka. As it name implies, its a tabbed based module to efficiently showcase your content to your visitors.We will take a quick look at the parameters you will find when you install this module. There are 4 columns, parameters, options, demo and description. The parameter column lists each available setting for the module; options lists the available options to choose from; demo lists the options chosen on the demo and description outlines what the module does.
Parameter
Show Title
Enabled
Position
Category
Section
Order
Authors
Theme Style
Width
Max # of Tabs
Transition Duration
Transition Type
Transition Effect
Tabs Position
Tabs Title
Incremental text
Hide h6 tags
Autoplay
Autoplay Delay
Module Suffix
Demo
Yes
Yes
Right
FP Tabs
RT Demo Content
Recently Modified First
Anyone
base
230
8
600
Scrolling
Quad.easInOut
Top
By Content Title
Tab
Yes
No
2000
promo
Description
Enable/Disable the module header
Enable/Disable the module
Position of the module
Category of content
Section of content
Ordering of content
A filter for the authors
Select a theme/style
Width of the module
Max number of Tabs
Time for transition
Type of transition
The transition effect
Position of the tabs
Determine the tab title
Set an incremental text
Hide h6 titles
Rotate automatically
Set delay on auto-rotation
A module class suffix
Publié dans
Demo Pages
The following is a guide that covers how to set up your new Akiraka template on your Joomla site. Here you can find an overview of the files included in the Akiraka release and instructions on installing and activating the template in your Joomla install.
[span class=attention] Video Tutorial Currently Available! Launch the Joomla Template Installation Video Tutorial now! [/span]Downloading the Akiraka Files
The first step is to download all the necessary files needed for installation, setup and customisation. Below is a summary of each of the available packages from the Akiraka release. [list class=bullet-1][li]Akiraka Template (rt_akiraka_j15.tgz) This file is the template package you will use to install your template into Joomla.[/li] [li]Akiraka Custom Extensions (akiraka-extensions-j15.zip) This package contains each of the individual custom extensions included in the Akiraka template release.[/li] [li]Akiraka Source PNG(s) (akiraka-sources.zip) This zip contains the source PNG(s) for making modifications and customisations to the images in the template (and if applicable, the font used for the logo). You will need an image editing software (preferably Adobe/Macromedia Fireworks) to utilise the Source PNG files. [/li] [li]Akiraka RocketLauncher (Joomla_RT_Akiraka_j15.zip) This is the RocketLauncher pack for Akiraka which is a complete and separate Joomla install which has the template pre-installed and configured. Similarly, the demo content is injected and the extensions are also pre-installed.[/li][/list]Step 1 - Using the Joomla installer
Navigate to the Joomla administrator (http://yoursite.com/administrator) for your site. Along the top menu bar, go to Extensions > Install/Uninstall. Next, select the browser button and located the rt_akiraka_j15.tgz package on your computer that you downloaded Then, click Upload File & Install. After installation, an introduction page will appear with the template's name, description and thumbnail, select Continue when this page appears. You should now see rt_akiraka_j15 in the list of installed templates.Step 2 - Making Akiraka Default
In the Joomla Administrator, navigate to Extensions > Template Manager. You will be directed to a page which lists all the install templates. Locate rt_akiraka_j15 in the list. Select the radio button / circular icon to the left of the name. Then select the Default in button menu in the top right area of the Administrator. The Akiraka template will now be the default template on your Joomla site.
Publié dans
Demo Pages
[tutorial url="index.php?option=com_content&view=article&id=54&Itemid=79" img="images/tutorials/icon1.png" title="Installing Akiraka" label="Read More..."]An overview of template files and instructions for installing and activating the template.[/tutorial]
[tutorial url="index.php?option=com_content&view=article&id=55&Itemid=80" img="images/tutorials/icon2.png" title="Custom Modules" label="Read More..."]Learn all about the included Akiraka custom modules and how to configure them for your site.[/tutorial]
[tutorial url="index.php?option=com_content&view=article&id=56&Itemid=81" img="images/tutorials/icon3.png" title="Menu Options" label="Read More..."]An overview of the Akiraka menu options including the top menu icon configuration.[/tutorial]
[tutorial url="index.php?option=com_content&view=article&id=57&Itemid=82" img="images/tutorials/icon4.png" title="Customisation" label="Read More..."]A guide to the Akiraka customisation options that can be configured within the template manager.[/tutorial]
[tutorial url="index.php?option=com_content&view=article&id=59&Itemid=83" img="images/tutorials/icon5.png" title="Using Typography" label="Read More..."]A guide to using the included the Akiraka typography styles in your site.[/tutorial]
[tutorial url="index.php?option=com_content&view=article&id=60&Itemid=85" img="images/tutorials/icon6.png" title="Demo Content" label="Read More..."]A look at some of the modules and techniques used in the demo content on the frontpage of the Akiraka demo.[/tutorial]
[tutorial url="index.php?option=com_content&view=article&id=58&Itemid=84" img="images/tutorials/icon7.png" title="Logo Editing" label="Read More..."]An overview for customizing your logo and replacing the logo text with your organization or company name and logo.[/tutorial]
[tutorial url="index.php?option=com_content&view=article&id=66&Itemid=90" img="images/tutorials/icon8.png" title="PNGfix" label="Read More..."]An overview of how to customize your Akiraka in respects to the Internet Explorer PNGfix.[/tutorial]
[contentheading]More Akiraka Template Tutorials[/contentheading]
Continue learning how to configure and customize the Akiraka template with the following guides and tutorials available in the RocketTheme members forum board.
Publié dans
Demo Pages
[span class=alert]The RokCandy component is required for the syntax below to work.[/span]
The below examples are using the syntax that functions when you use the new RocketTheme component, RokCandy. RokCandy processes your content and changes the pre-defined syntax such as [important] to the correct, and pre-formatted HTML that had to be entered in manually before RokCandy. The component is compatible with WYSIWYG editors so you do not need to worry if you or your client, have little knowledge of HTML.
If you wish to view the typography page, showing how to setup the various typography elements with HTML, then please go to the HTML Typography page. [h3]Font Control[/h3] Akiraka allows you to have the option of simply switching the font of all the text in the template with the following setting in the template manager (select the font name to preview):-
[clear] [componentheading]This is a ComponentHeading[/componentheading]
[number color=red value=4]To use this style create a list in the following format: [number color=red value=4]...some content...[/number][/number] [number color=blue value=5]To use this style create a list in the following format: [number color=blue value=5]...some content...[/number][/number] [number color=green value=6]To use this style create a list in the following format: [number color=green value=6]...some content...[/number][/number]
[number color=purple value=7]To use this style create a list in the following format: [number color=purple value=7]...some content...[/number][/number] [number color=orange value=8]To use this style create a list in the following format: [number color=orange value=8]...some content...[/number][/number] [number color=brown value=9]To use this style create a list in the following format: [number color=brown value=9]...some content...[/number][/number] [number color=grey value=10]To use this style create a list in the following format: [number color=grey value=10]...some content...[/number][/number]
[h3]Highlight Styles[/h3] This is a span that allows you to [highlight]highlight words or phrases[/highlight]. Use the following format: [highlight] ... some content ... [/highlight]
This is a span that allows you to [highlight color=red]highlight words or phrases[/highlight]. Use the following format: [highlight color=red] ... some content .... [/highlight]
This is a span that allows you to [highlight color=blue]highlight words or phrases[/highlight]. Use the following format: [highlight color=blue] ... some content .... [/highlight]
This is a span that allows you to [highlight color=green]highlight words or phrases[/highlight]. Use the following format: [highlight color=green] ... some content .... [/highlight]
This is a span that allows you to [highlight color=orange]highlight words or phrases[/highlight]. Use the following format: [highlight color=orange] ... some content .... [/highlight]
This is a span that allows you to [highlight color=brown]highlight words or phrases[/highlight]. Use the following format: [highlight color=brown] ... some content .... [/highlight]
This is a span that allows you to [highlight color=purple]highlight words or phrases[/highlight]. Use the following format: [highlight color=purple] ... some content .... [/highlight]
This is a span that allows you to [highlight color=grey]highlight words or phrases[/highlight]. Use the following format: [highlight color=grey] ... some content .... [/highlight]
This is a span that allows you to [highlight color=bold]highlight words or phrases[/highlight]. Use the following format: [highlight color=bold] ... some content .... [/highlight]
[h3]Inset Styles[/h3]
[h3]DropCap Styles[/h3] [dropcap cap=P]Praesent rutrum sapien ac felis. Phasellus elementum dolor quis turpis. Vestibulum nec mi vitae pede tincidunt nonummy. Vestibulum facilisis mollis neque. Sed orci. Cum sociis natoque penatibus et magnis dis parturient montes, nascetur ridiculus mus. Sed euismod magna a nibh. Praesent rutrum sapien ac felis. Phasellus elementum dolor quis turpis. Vestibulum nec mi vitae pede tincidunt nonummy. Vestibulum facilisis mollis neque. Sed orci. Cum sociis natoque penatibus et magnis dis parturient montes, nascetur ridiculus mus. Sed euismod magna a nibh.
You will need to use the following formatting: [dropcap cap=P]...some content...[/dropcap][/dropcap] [dropcap color=red cap=P]Praesent rutrum sapien ac felis. Phasellus elementum dolor quis turpis. Vestibulum nec mi vitae pede tincidunt nonummy. Vestibulum facilisis mollis neque. Sed orci. Cum sociis natoque penatibus et magnis dis parturient montes, nascetur ridiculus mus. Sed euismod magna a nibh. Praesent rutrum sapien ac felis. Phasellus elementum dolor quis turpis. Vestibulum nec mi vitae pede tincidunt nonummy. Vestibulum facilisis mollis neque. Sed orci. Cum sociis natoque penatibus et magnis dis parturient montes, nascetur ridiculus mus. Sed euismod magna a nibh.
You will need to use the following formatting: [dropcap color=red cap=P]...some content....[/dropcap][/dropcap] [dropcap color=blue cap=P]Praesent rutrum sapien ac felis. Phasellus elementum dolor quis turpis. Vestibulum nec mi vitae pede tincidunt nonummy. Vestibulum facilisis mollis neque. Sed orci. Cum sociis natoque penatibus et magnis dis parturient montes, nascetur ridiculus mus. Sed euismod magna a nibh. Praesent rutrum sapien ac felis. Phasellus elementum dolor quis turpis. Vestibulum nec mi vitae pede tincidunt nonummy. Vestibulum facilisis mollis neque. Sed orci. Cum sociis natoque penatibus et magnis dis parturient montes, nascetur ridiculus mus. Sed euismod magna a nibh.
You will need to use the following formatting: [dropcap color=blue cap=P]...some content....[/dropcap][/dropcap] [dropcap color=green cap=P]Praesent rutrum sapien ac felis. Phasellus elementum dolor quis turpis. Vestibulum nec mi vitae pede tincidunt nonummy. Vestibulum facilisis mollis neque. Sed orci. Cum sociis natoque penatibus et magnis dis parturient montes, nascetur ridiculus mus. Sed euismod magna a nibh. Praesent rutrum sapien ac felis. Phasellus elementum dolor quis turpis. Vestibulum nec mi vitae pede tincidunt nonummy. Vestibulum facilisis mollis neque. Sed orci. Cum sociis natoque penatibus et magnis dis parturient montes, nascetur ridiculus mus. Sed euismod magna a nibh.
You will need to use the following formatting: [dropcap color=green cap=P]...some content....[/dropcap][/dropcap] [dropcap color=purple cap=P]Praesent rutrum sapien ac felis. Phasellus elementum dolor quis turpis. Vestibulum nec mi vitae pede tincidunt nonummy. Vestibulum facilisis mollis neque. Sed orci. Cum sociis natoque penatibus et magnis dis parturient montes, nascetur ridiculus mus. Sed euismod magna a nibh. Praesent rutrum sapien ac felis. Phasellus elementum dolor quis turpis. Vestibulum nec mi vitae pede tincidunt nonummy. Vestibulum facilisis mollis neque. Sed orci. Cum sociis natoque penatibus et magnis dis parturient montes, nascetur ridiculus mus. Sed euismod magna a nibh.
You will need to use the following formatting: [dropcap color=purple cap=P]...some content....[/dropcap][/dropcap] [dropcap color=orange cap=P]Praesent rutrum sapien ac felis. Phasellus elementum dolor quis turpis. Vestibulum nec mi vitae pede tincidunt nonummy. Vestibulum facilisis mollis neque. Sed orci. Cum sociis natoque penatibus et magnis dis parturient montes, nascetur ridiculus mus. Sed euismod magna a nibh. Praesent rutrum sapien ac felis. Phasellus elementum dolor quis turpis. Vestibulum nec mi vitae pede tincidunt nonummy. Vestibulum facilisis mollis neque. Sed orci. Cum sociis natoque penatibus et magnis dis parturient montes, nascetur ridiculus mus. Sed euismod magna a nibh.
You will need to use the following formatting: [dropcap color=orange cap=P]...some content....[/dropcap][/dropcap] [dropcap color=brown cap=P]Praesent rutrum sapien ac felis. Phasellus elementum dolor quis turpis. Vestibulum nec mi vitae pede tincidunt nonummy. Vestibulum facilisis mollis neque. Sed orci. Cum sociis natoque penatibus et magnis dis parturient montes, nascetur ridiculus mus. Sed euismod magna a nibh. Praesent rutrum sapien ac felis. Phasellus elementum dolor quis turpis. Vestibulum nec mi vitae pede tincidunt nonummy. Vestibulum facilisis mollis neque. Sed orci. Cum sociis natoque penatibus et magnis dis parturient montes, nascetur ridiculus mus. Sed euismod magna a nibh.
You will need to use the following formatting: [dropcap color=brown cap=P]...some content....[/dropcap][/dropcap] [dropcap color=grey cap=P]Praesent rutrum sapien ac felis. Phasellus elementum dolor quis turpis. Vestibulum nec mi vitae pede tincidunt nonummy. Vestibulum facilisis mollis neque. Sed orci. Cum sociis natoque penatibus et magnis dis parturient montes, nascetur ridiculus mus. Sed euismod magna a nibh. Praesent rutrum sapien ac felis. Phasellus elementum dolor quis turpis. Vestibulum nec mi vitae pede tincidunt nonummy. Vestibulum facilisis mollis neque. Sed orci. Cum sociis natoque penatibus et magnis dis parturient montes, nascetur ridiculus mus. Sed euismod magna a nibh.
You will need to use the following formatting: [dropcap color=grey cap=P]...some content....[/dropcap][/dropcap] [h3]Important Emphasis Styles[/h3] [important title=Sample Title]This is a span that lets you place all of the content into a nice well formed section. You will need to use the following formatting: [important title=Sample Title]...some content[/important][/important]
[important color=blue title=Sample Title]This is a span that lets you place all of the content into a nice well formed section. You will need to use the following formatting: [important color=blue title=Sample Title]...some content...[/important][/important]
[important color=red title=Sample Title]This is a span that lets you place all of the content into a nice well formed section. You will need to use the following formatting: [important color=red title=Sample Title]...some content...[/important][/important]
[important color=green title=Sample Title]This is a span that lets you place all of the content into a nice well formed section. You will need to use the following formatting: [important color=green title=Sample Title]...some content...[/important][/important]
[important color=purple title=Sample Title]This is a span that lets you place all of the content into a nice well formed section. You will need to use the following formatting: [important color=purple title=Sample Title]...some content...[/important][/important]
[important color=brown title=Sample Title]This is a span that lets you place all of the content into a nice well formed section. You will need to use the following formatting: [important color=brown title=Sample Title]...some content...[/important][/important]
[important color=orange title=Sample Title]This is a span that lets you place all of the content into a nice well formed section. You will need to use the following formatting: [important color=orange title=Sample Title]...some content...[/important][/important]
[important color=grey title=Sample Title]This is a span that lets you place all of the content into a nice well formed section. You will need to use the following formatting: [important color=grey title=Sample Title]...some content...[/important][/important]
If you wish to view the typography page, showing how to setup the various typography elements with HTML, then please go to the HTML Typography page. [h3]Font Control[/h3] Akiraka allows you to have the option of simply switching the font of all the text in the template with the following setting in the template manager (select the font name to preview):-
[clear] [componentheading]This is a ComponentHeading[/componentheading]
Praesent rutrum sapien ac felis. Phasellus elementum dolor quis turpis. Vestibulum nec mi vitae pede tincidunt nonummy. Vestibulum facilisis mollis neque. Sed orci. Cum sociis natoque penatibus et magnis dis parturient montes, nascetur ridiculus mus. Sed euismod magna a nibh.
[contentheading]This is a ContentHeading[/contentheading]Proin ac nunc eu nunc condimentum accumsan. Phasellus odio justo, euismod vitae, egestas a, porttitor in, urna. Maecenas vitae mauris. Donec vestibulum, nunc eu varius pharetra, massa est sagittis odio, sit amet eleifend elit dolor id tortor.
[h1]This is an H1 Header[/h1]Lorem ipsum dolor sit amet, consectetuer adipiscing elit. Proin sit amet odio quis sapien molestie ultrices. Vivamus quis lectus. Praesent eu mi. Curabitur pharetra leo sed nisl. Nunc vel nisi. Aliquam nulla. Etiam at est. Pellentesque arcu diam, tempus nec, sodales eu, ullamcorper quis, risus.
[h2]This is an H2 Header[/h2]Proin ac nunc eu nunc condimentum accumsan. Phasellus odio justo, euismod vitae, egestas a, porttitor in, urna. Maecenas vitae mauris. Donec vestibulum, nunc eu varius pharetra, massa est sagittis odio, sit amet eleifend elit dolor id tortor.
[h3]This is an H3 Header[/h3]Mauris euismod. In ac massa vitae quam tincidunt dapibus. Ut at tortor nec mi mattis blandit. Maecenas venenatis lorem at nulla. Phasellus a libero. Sed odio odio, eleifend dignissim, feugiat vel, tempor nec, ligula. Suspendisse lacinia convallis nulla. Vestibulum posuere, lacus aliquet pulvinar faucibus, tortor urna luctus diam, vitae ultrices ante magna non tellus.
[h4]This is an H4 Header[/h4]Mauris euismod. In ac massa vitae quam tincidunt dapibus. Ut at tortor nec mi mattis blandit. Maecenas venenatis lorem at nulla. Phasellus a libero. Sed odio odio, eleifend dignissim, feugiat vel, tempor nec, ligula. Suspendisse lacinia convallis nulla. Vestibulum posuere, lacus aliquet pulvinar faucibus, tortor urna luctus diam, vitae ultrices ante magna non tellus.
[h5]This is an H5 Header[/h5]Mauris euismod. In ac massa vitae quam tincidunt dapibus. Ut at tortor nec mi mattis blandit. Maecenas venenatis lorem at nulla. Phasellus a libero. Sed odio odio, eleifend dignissim, feugiat vel, tempor nec, ligula. Suspendisse lacinia convallis nulla. Vestibulum posuere, lacus aliquet pulvinar faucibus, tortor urna luctus diam, vitae ultrices ante magna non tellus.
[h4]Notice Styles are shown below[/h4] [span class=attention]This is a sample of the 'attention' style. Use this style to denote very important information to your users. To use this use the following html: [span class=attention] ...some content.... [/span][/span] [span class=notice]This is a sample of the 'notice' style. Use this style to denote very important information to your users. To use this use the following html: [span class=notice] ...some content.... [/span][/span] [span class=alert]This is a sample of the 'alert' style. Use this style to denote very important information to your users. To use this use the following html: [span class=alert] ...some content.... [/span][/span] [span class=download]This is a sample of the 'download' style. Use this style to denote very important information to your users. To use this use the following html: [span class=download] ...some content.... [/span][/span] [span class=approved]This is a sample of the 'approved' style. Use this style to denote very important information to your users. To use this use the following html: [span class=approved] ...some content.... [/span][/span] [span class=media]This is a sample of the 'media' style. Use this style to denote very important information to your users. To use this use the following html: [span class=media] ...some content.... [/span][/span] [span class=note]This is a sample of the 'note' style. Use this style to denote very important information to your users. To use this use the following html: [span class=note] ...some content.... [/span][/span] [span class=cart]This is a sample of the 'cart' style. Use this style to denote very important information to your users. To use this use the following html: [span class=card] ...some content.... [/span][/span] [span class=camera]This is a sample of the 'camera' style. Use this style to denote very important information to your users. To use this use the following html: [span class=camera] ...some content.... [/span][/span] [span class=doc]This is a sample of the 'doc' style. Use this style to denote very important information to your users. To use this use the following html: [span class=doc] ...some content.... [/span][/span] [pre] This is a sample [pre] ... [/pre] tag: [/pre] [h3]Blockquote Styles[/h3] [blockquote]This is a blockquote, you will want to use the following formatting: [blockquote]....[/blockquote]Praesent rutrum sapien ac felis. Phasellus elementum dolor quis turpis. Vestibulum nec mi vitae pede tincidunt nonummy. Vestibulum facilisis mollis neque. Sed orci. Cum sociis natoque penatibus et magnis dis parturient montes, nascetur ridiculus mus. Sed euismod magna a nibh.[/blockquote] [blockquote class=blue]This is a blockquote, you will want to use the following formatting: [blockquote class=blue]...[/blockquote] Praesent rutrum sapien ac felis. Phasellus elementum dolor quis turpis. Vestibulum nec mi vitae pede tincidunt nonummy. Vestibulum facilisis mollis neque. Sed orci. Cum sociis natoque penatibus et magnis dis parturient montes, nascetur ridiculus mus. Sed euismod magna a nibh.[/blockquote] [blockquote class=red]This is a blockquote, you will want to use the following formatting: [blockquote class=red]...[/blockquote]Praesent rutrum sapien ac felis. Phasellus elementum dolor quis turpis. Vestibulum nec mi vitae pede tincidunt nonummy. Vestibulum facilisis mollis neque. Sed orci. Cum sociis natoque penatibus et magnis dis parturient montes, nascetur ridiculus mus. Sed euismod magna a nibh.[/blockquote] [blockquote class=green]This is a blockquote, you will want to use the following formatting: [blockquote class=green]...[/blockquote]Praesent rutrum sapien ac felis. Phasellus elementum dolor quis turpis. Vestibulum nec mi vitae pede tincidunt nonummy. Vestibulum facilisis mollis neque. Sed orci. Cum sociis natoque penatibus et magnis dis parturient montes, nascetur ridiculus mus. Sed euismod magna a nibh.[/blockquote] [blockquote class=purple]This is a blockquote, you will want to use the following formatting: [blockquote class=purple]...[/blockquote]Praesent rutrum sapien ac felis. Phasellus elementum dolor quis turpis. Vestibulum nec mi vitae pede tincidunt nonummy. Vestibulum facilisis mollis neque. Sed orci. Cum sociis natoque penatibus et magnis dis parturient montes, nascetur ridiculus mus. Sed euismod magna a nibh.[/blockquote] [blockquote class=orange]This is a blockquote, you will want to use the following formatting: [blockquote class=orange]...[/blockquote]Praesent rutrum sapien ac felis. Phasellus elementum dolor quis turpis. Vestibulum nec mi vitae pede tincidunt nonummy. Vestibulum facilisis mollis neque. Sed orci. Cum sociis natoque penatibus et magnis dis parturient montes, nascetur ridiculus mus. Sed euismod magna a nibh.[/blockquote] [blockquote class=brown]This is a blockquote, you will want to use the following formatting: [blockquote class=brown]...[/blockquote]Praesent rutrum sapien ac felis. Phasellus elementum dolor quis turpis. Vestibulum nec mi vitae pede tincidunt nonummy. Vestibulum facilisis mollis neque. Sed orci. Cum sociis natoque penatibus et magnis dis parturient montes, nascetur ridiculus mus. Sed euismod magna a nibh.[/blockquote] [blockquote class=grey]This is a blockquote, you will want to use the following formatting: [blockquote class=grey]...[/blockquote]Praesent rutrum sapien ac felis. Phasellus elementum dolor quis turpis. Vestibulum nec mi vitae pede tincidunt nonummy. Vestibulum facilisis mollis neque. Sed orci. Cum sociis natoque penatibus et magnis dis parturient montes, nascetur ridiculus mus. Sed euismod magna a nibh.[/blockquote]
[h3]List Styles - Bullets[/h3]
[h3]Span Styles - Number[/h3]
Below is a list with bullets. To use this style create a list in the following format: [list class=class name][li]....[/li][li....[/li][/list]
[list class=bullet-1][li]To use this style create a list in the following format: [list class=bullet-1][li]...[/li][li]...[/li][/list].[/li][/list] [list class=bullet-2][li]To use this style create a list in the following format: [list class=bullet-2][li]...[/li][li]...[/li][/list].[/li][/list] [list class=bullet-3][li]To use this style create a list in the following format: [list class=bullet-3][li]...[/li][li]...[/li][/list].[/li][/list] [list class=bullet-4][li]To use this style create a list in the following format: [list class=bullet-4][li]...[/li][li]...[/li][/list].[/li][/list] [list class=bullet-5][li]To use this style create a list in the following format: [list class=bullet-5][li]...[/li][li]...[/li][/list].[/li][/list] [list class=bullet-6][li]To use this style create a list in the following format: [list class=bullet-6][li]...[/li][li]...[/li][/list].[/li][/list] [list class=bullet-7][li]To use this style create a list in the following format: [list class=bullet-7][li]...[/li][li]...[/li][/list].[/li][/list] [list class=bullet-8][li]To use this style create a list in the following format: [list class=bullet-8][li]...[/li][li]...[/li][/list].[/li][/list]Below is a list with number. To use this style create a list in the following format:[number color=color value=1]...some content...[/number]
[number value=1]To use this style create a list in the following format: [number value=1]...some content...[/number][/number] [number value=2]To use this style create a list in the following format: [number value=2]...some content...[/number][/number] [number value=3]To use this style create a list in the following format: [number value=3]...some content...[/number][/number][number color=red value=4]To use this style create a list in the following format: [number color=red value=4]...some content...[/number][/number] [number color=blue value=5]To use this style create a list in the following format: [number color=blue value=5]...some content...[/number][/number] [number color=green value=6]To use this style create a list in the following format: [number color=green value=6]...some content...[/number][/number]
[number color=purple value=7]To use this style create a list in the following format: [number color=purple value=7]...some content...[/number][/number] [number color=orange value=8]To use this style create a list in the following format: [number color=orange value=8]...some content...[/number][/number] [number color=brown value=9]To use this style create a list in the following format: [number color=brown value=9]...some content...[/number][/number] [number color=grey value=10]To use this style create a list in the following format: [number color=grey value=10]...some content...[/number][/number]
[h3]Highlight Styles[/h3] This is a span that allows you to [highlight]highlight words or phrases[/highlight]. Use the following format: [highlight] ... some content ... [/highlight]
This is a span that allows you to [highlight color=red]highlight words or phrases[/highlight]. Use the following format: [highlight color=red] ... some content .... [/highlight]
This is a span that allows you to [highlight color=blue]highlight words or phrases[/highlight]. Use the following format: [highlight color=blue] ... some content .... [/highlight]
This is a span that allows you to [highlight color=green]highlight words or phrases[/highlight]. Use the following format: [highlight color=green] ... some content .... [/highlight]
This is a span that allows you to [highlight color=orange]highlight words or phrases[/highlight]. Use the following format: [highlight color=orange] ... some content .... [/highlight]
This is a span that allows you to [highlight color=brown]highlight words or phrases[/highlight]. Use the following format: [highlight color=brown] ... some content .... [/highlight]
This is a span that allows you to [highlight color=purple]highlight words or phrases[/highlight]. Use the following format: [highlight color=purple] ... some content .... [/highlight]
This is a span that allows you to [highlight color=grey]highlight words or phrases[/highlight]. Use the following format: [highlight color=grey] ... some content .... [/highlight]
This is a span that allows you to [highlight color=bold]highlight words or phrases[/highlight]. Use the following format: [highlight color=bold] ... some content .... [/highlight]
[h3]Inset Styles[/h3]
Praesent rutrum sapien ac felis. Phasellus elementum dolor quis turpis. Vestibulum nec mi vitae pede tincidunt nonummy. Vestibulum facilisis mollis neque. Sed orci. Cum sociis natoque penatibus et magnis dis parturient montes, nascetur ridiculus mus.[inset side=right]You will need to use the following formatting: [inset side=right] ... some content ...[/inset][/inset]Vestibulum facilisis mollis neque. Sed orci. Cum sociis natoque penatibus et magnis dis parturient montes, nascetur ridiculus mus. Sed euismod magna a nibh.
Sed euismod magna a nibh. Praesent rutrum sapien ac felis. Phasellus elementum dolor quis turpis. Vestibulum nec mi vitae pede tincidunt nonummy. Praesent rutrum sapien ac felis. Phasellus elementum dolor quis turpis. Vestibulum nec mi vitae pede tincidunt nonummy. Vestibulum facilisis mollis neque. Sed orci. Cum sociis natoque penatibus et magnis dis parturient montes, nascetur ridiculus mus.Praesent rutrum sapien ac felis. Phasellus elementum dolor quis turpis. Vestibulum nec mi vitae pede tincidunt nonummy. Vestibulum facilisis mollis neque. Sed orci. Cum sociis natoque penatibus et magnis dis parturient montes, nascetur ridiculus mus.
Praesent rutrum sapien ac felis. Phasellus elementum dolor quis turpis. Vestibulum nec mi vitae pede tincidunt nonummy. Vestibulum facilisis mollis neque. Sed orci. Cum sociis natoque penatibus et magnis dis parturient montes, nascetur ridiculus mus.[inset side=left]You will need to use the following formatting: [inset side=left] ... some content ...[/inset][/inset]Vestibulum facilisis mollis neque. Sed orci. Cum sociis natoque penatibus et magnis dis parturient montes, nascetur ridiculus mus. Sed euismod magna a nibh.
Sed euismod magna a nibh. Praesent rutrum sapien ac felis. Phasellus elementum dolor quis turpis. Vestibulum nec mi vitae pede tincidunt nonummy. Praesent rutrum sapien ac felis. Phasellus elementum dolor quis turpis. Vestibulum nec mi vitae pede tincidunt nonummy. Vestibulum facilisis mollis neque. Sed orci. Cum sociis natoque penatibus et magnis dis parturient montes, nascetur ridiculus mus.Praesent rutrum sapien ac felis. Phasellus elementum dolor quis turpis. Vestibulum nec mi vitae pede tincidunt nonummy. Vestibulum facilisis mollis neque. Sed orci. Cum sociis natoque penatibus et magnis dis parturient montes, nascetur ridiculus mus.
[h3]DropCap Styles[/h3] [dropcap cap=P]Praesent rutrum sapien ac felis. Phasellus elementum dolor quis turpis. Vestibulum nec mi vitae pede tincidunt nonummy. Vestibulum facilisis mollis neque. Sed orci. Cum sociis natoque penatibus et magnis dis parturient montes, nascetur ridiculus mus. Sed euismod magna a nibh. Praesent rutrum sapien ac felis. Phasellus elementum dolor quis turpis. Vestibulum nec mi vitae pede tincidunt nonummy. Vestibulum facilisis mollis neque. Sed orci. Cum sociis natoque penatibus et magnis dis parturient montes, nascetur ridiculus mus. Sed euismod magna a nibh.
You will need to use the following formatting: [dropcap cap=P]...some content...[/dropcap][/dropcap] [dropcap color=red cap=P]Praesent rutrum sapien ac felis. Phasellus elementum dolor quis turpis. Vestibulum nec mi vitae pede tincidunt nonummy. Vestibulum facilisis mollis neque. Sed orci. Cum sociis natoque penatibus et magnis dis parturient montes, nascetur ridiculus mus. Sed euismod magna a nibh. Praesent rutrum sapien ac felis. Phasellus elementum dolor quis turpis. Vestibulum nec mi vitae pede tincidunt nonummy. Vestibulum facilisis mollis neque. Sed orci. Cum sociis natoque penatibus et magnis dis parturient montes, nascetur ridiculus mus. Sed euismod magna a nibh.
You will need to use the following formatting: [dropcap color=red cap=P]...some content....[/dropcap][/dropcap] [dropcap color=blue cap=P]Praesent rutrum sapien ac felis. Phasellus elementum dolor quis turpis. Vestibulum nec mi vitae pede tincidunt nonummy. Vestibulum facilisis mollis neque. Sed orci. Cum sociis natoque penatibus et magnis dis parturient montes, nascetur ridiculus mus. Sed euismod magna a nibh. Praesent rutrum sapien ac felis. Phasellus elementum dolor quis turpis. Vestibulum nec mi vitae pede tincidunt nonummy. Vestibulum facilisis mollis neque. Sed orci. Cum sociis natoque penatibus et magnis dis parturient montes, nascetur ridiculus mus. Sed euismod magna a nibh.
You will need to use the following formatting: [dropcap color=blue cap=P]...some content....[/dropcap][/dropcap] [dropcap color=green cap=P]Praesent rutrum sapien ac felis. Phasellus elementum dolor quis turpis. Vestibulum nec mi vitae pede tincidunt nonummy. Vestibulum facilisis mollis neque. Sed orci. Cum sociis natoque penatibus et magnis dis parturient montes, nascetur ridiculus mus. Sed euismod magna a nibh. Praesent rutrum sapien ac felis. Phasellus elementum dolor quis turpis. Vestibulum nec mi vitae pede tincidunt nonummy. Vestibulum facilisis mollis neque. Sed orci. Cum sociis natoque penatibus et magnis dis parturient montes, nascetur ridiculus mus. Sed euismod magna a nibh.
You will need to use the following formatting: [dropcap color=green cap=P]...some content....[/dropcap][/dropcap] [dropcap color=purple cap=P]Praesent rutrum sapien ac felis. Phasellus elementum dolor quis turpis. Vestibulum nec mi vitae pede tincidunt nonummy. Vestibulum facilisis mollis neque. Sed orci. Cum sociis natoque penatibus et magnis dis parturient montes, nascetur ridiculus mus. Sed euismod magna a nibh. Praesent rutrum sapien ac felis. Phasellus elementum dolor quis turpis. Vestibulum nec mi vitae pede tincidunt nonummy. Vestibulum facilisis mollis neque. Sed orci. Cum sociis natoque penatibus et magnis dis parturient montes, nascetur ridiculus mus. Sed euismod magna a nibh.
You will need to use the following formatting: [dropcap color=purple cap=P]...some content....[/dropcap][/dropcap] [dropcap color=orange cap=P]Praesent rutrum sapien ac felis. Phasellus elementum dolor quis turpis. Vestibulum nec mi vitae pede tincidunt nonummy. Vestibulum facilisis mollis neque. Sed orci. Cum sociis natoque penatibus et magnis dis parturient montes, nascetur ridiculus mus. Sed euismod magna a nibh. Praesent rutrum sapien ac felis. Phasellus elementum dolor quis turpis. Vestibulum nec mi vitae pede tincidunt nonummy. Vestibulum facilisis mollis neque. Sed orci. Cum sociis natoque penatibus et magnis dis parturient montes, nascetur ridiculus mus. Sed euismod magna a nibh.
You will need to use the following formatting: [dropcap color=orange cap=P]...some content....[/dropcap][/dropcap] [dropcap color=brown cap=P]Praesent rutrum sapien ac felis. Phasellus elementum dolor quis turpis. Vestibulum nec mi vitae pede tincidunt nonummy. Vestibulum facilisis mollis neque. Sed orci. Cum sociis natoque penatibus et magnis dis parturient montes, nascetur ridiculus mus. Sed euismod magna a nibh. Praesent rutrum sapien ac felis. Phasellus elementum dolor quis turpis. Vestibulum nec mi vitae pede tincidunt nonummy. Vestibulum facilisis mollis neque. Sed orci. Cum sociis natoque penatibus et magnis dis parturient montes, nascetur ridiculus mus. Sed euismod magna a nibh.
You will need to use the following formatting: [dropcap color=brown cap=P]...some content....[/dropcap][/dropcap] [dropcap color=grey cap=P]Praesent rutrum sapien ac felis. Phasellus elementum dolor quis turpis. Vestibulum nec mi vitae pede tincidunt nonummy. Vestibulum facilisis mollis neque. Sed orci. Cum sociis natoque penatibus et magnis dis parturient montes, nascetur ridiculus mus. Sed euismod magna a nibh. Praesent rutrum sapien ac felis. Phasellus elementum dolor quis turpis. Vestibulum nec mi vitae pede tincidunt nonummy. Vestibulum facilisis mollis neque. Sed orci. Cum sociis natoque penatibus et magnis dis parturient montes, nascetur ridiculus mus. Sed euismod magna a nibh.
You will need to use the following formatting: [dropcap color=grey cap=P]...some content....[/dropcap][/dropcap] [h3]Important Emphasis Styles[/h3] [important title=Sample Title]This is a span that lets you place all of the content into a nice well formed section. You will need to use the following formatting: [important title=Sample Title]...some content[/important][/important]
[important color=blue title=Sample Title]This is a span that lets you place all of the content into a nice well formed section. You will need to use the following formatting: [important color=blue title=Sample Title]...some content...[/important][/important]
[important color=red title=Sample Title]This is a span that lets you place all of the content into a nice well formed section. You will need to use the following formatting: [important color=red title=Sample Title]...some content...[/important][/important]
[important color=green title=Sample Title]This is a span that lets you place all of the content into a nice well formed section. You will need to use the following formatting: [important color=green title=Sample Title]...some content...[/important][/important]
[important color=purple title=Sample Title]This is a span that lets you place all of the content into a nice well formed section. You will need to use the following formatting: [important color=purple title=Sample Title]...some content...[/important][/important]
[important color=brown title=Sample Title]This is a span that lets you place all of the content into a nice well formed section. You will need to use the following formatting: [important color=brown title=Sample Title]...some content...[/important][/important]
[important color=orange title=Sample Title]This is a span that lets you place all of the content into a nice well formed section. You will need to use the following formatting: [important color=orange title=Sample Title]...some content...[/important][/important]
[important color=grey title=Sample Title]This is a span that lets you place all of the content into a nice well formed section. You will need to use the following formatting: [important color=grey title=Sample Title]...some content...[/important][/important]
Publié dans
Demo Pages
Akiraka has a range of hilites which offer diversity for your module content. The hilites are light, medium, dark and ad.
To apply the suffixes, login into the administrator and navigate to Extensions > Module Manager. There, select your module and locate the Module Class Suffix input field. Insert your module class suffix in this box and save.
To apply the suffixes, login into the administrator and navigate to Extensions > Module Manager. There, select your module and locate the Module Class Suffix input field. Insert your module class suffix in this box and save.
Publié dans
Demo Pages
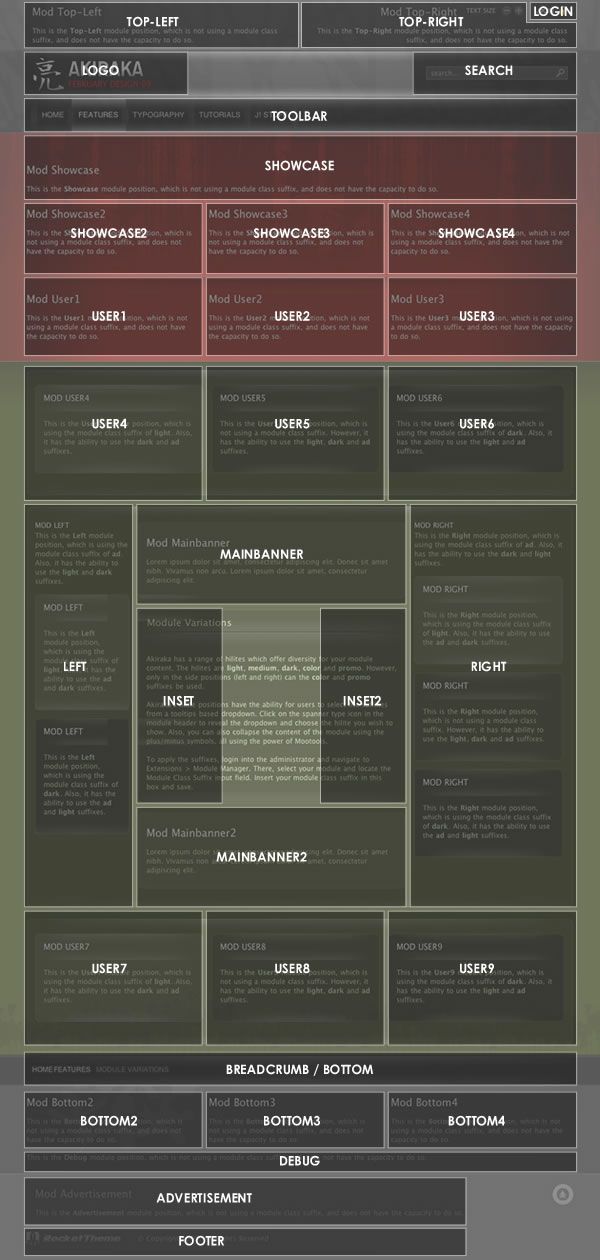
Akiraka has been constructed with an assortment of 32 module positions allowing for versatility and flexibility. Most of these module positions are fully collapsible meaning that if there are no modules published in particular area, that module area will not be shown.
Several of these positions may not appear to be positions, such as the Logo, Footer and Toolbar. However, by publishing modules to see positions, the elements are automatically disabled and replaced by your module content.
Publié dans
Demo Pages
Akiraka is a stylish professional design with lots of versatility. You can choose one of the included color styles by specifying it in the template configuration.


Publié dans
Demo Pages
Plus...
[span class=alert]Please note that RokBox is not part of the template but is an independent download from http://www.rocketwerx.com/products/rokbox/overview.[/span]
RokBox, the successor of our popular RokZoom plugin, is a mootools powered JavaScript slideshow that allows you to quickly and easily display multiple media formats including images, videos (video sharing services also) and music. RokBox provides a theme system that allows you to create your own custom ones to fit your websites design. It includes two predefined themes, a Light theme and a Dark theme that will fit seamlessly into your site design. RokBox is as easy as pie to install and customize, providing an easy way to create your own custom themes for it.
RokBox comes in 3 formats. A standalone HTML/JavaScript solution for inclusion in any website or page; A Joomla 1.0 plugin, and a Joomla 1.5 plugin. Each Joomla! plugins come with a system and a content plugin.
We highly recommend using RokBox in Joomla 1.5 for optimal performance and ease of use.
Screenshots
[rbxshot img="http://rocketwerx.com/images/rokbox/sshot1_thumb.jpg"]RokBox Light Theme :: A screenshot of an image shown with RokBox in the default light style[/rbxshot] [rbxshot img="http://rocketwerx.com/images/rokbox/sshot2_thumb.jpg"]RokBox Dark Theme :: A screenshot of an image shown with RokBox in the optional dark style[/rbxshot] [rbxshot img="http://rocketwerx.com/images/rokbox/sshot3_thumb.jpg"]RokBox System Plugin Prefernces :: The plugin is fully configurable via the system plugin prefences parameters[/rbxshot]Features
- Mootools v1.11 compatible
- 4 Customizable Transition Type: Fade, QuickSilver, Growl, Explode.
- Support for Images, QuickTime (.mov), Windows Media Video (.wmv), Flash (.swf), YouTube, DailyMotion, MetaCafe, Google Video, Vimeo, Audio (.mp3, .wav), local and remote sites.
- Support for albums/categories.
- Support for Captions including support for titles and descriptions.
- 2 Predefined Themes provided: Light Theme, Dark Theme.
- Support for custom themes with ability to customize styles and RokBox configuration per theme.
- Ability to auto-generate thumbnails when RokBox-ing local images.
- Support for generate thumbnail or inline links from your Joomla! Content.
History
RokBox is a Joomla! plugin inspired by the now famous LightBox, but with a large support for multimedia content and not only images. RokBox is written by Djamil Legato.
Demo
To see an extensive demo of RokBox with descriptions and syntax, please visit http://www.rocketwerx.com/products/rokbox/demo
Publié dans
Demo Pages
RocketTheme templates feature some amazingly advanced features and layout possibilities that open up a wide world of options for your sites. Unfortunately, the default Joomla content in a new Joomla install is very limited and does little to take advantage of the abilities of a modern Joomla template.
Each of our demo sites have been highly customised to show off the abilities of each template and give that "professional touch" to the look and feel of the content. This professional look could not be achieved without hands on manual customisation, that is, until now.
Akiraka now features the exciting RocketLauncher custom Joomla install option. With the RocketLauncher Akiraka Joomla installer, you can instantly create a Joomla site complete with custom content that is a perfect replica of our Akiraka demo site that has been professionally tuned to look its best, all with just a few clicks.
The Akiraka RocketLauncher package consists of a full 1.5.9 Joomla install, complete with all of the demo images, content, modules, and extensions. By running the installer, your Joomla site will be set up with everything needed to create an exact implementation of the demo site automatically.
[span class=alert]RocketLauncher includes a FULL Joomla install, in addition to the template and demo contents. The Joomla installation process is necessary in creating the demo content, therefore RocketLauncher will only work properly as a new Joomla installation. It can not be used on an existing Joomla installation.[/span]Instructions
Upload the filesDownload the separate Akiraka RocketLauncher package (Joomla_RT_Akiraka_j15.zip) from the Akiraka template downloads section. Unzip the RocketLauncher package, after which you will have a folder named "Joomla_RT_Akiraka_j15". Using your FTP client, upload all of the files inside of the "Joomla_RT_Akiraka_j15" folder (not the folder itself) to your server as you would a standard Joomla installation package. You upload the files with a FTP client such as Filezilla. Want to learn more...?
Run the Installer
Point your browser to the location where you uploaded your RocketLauncher files (whichever domain/folder you uploaded to, generally the root of your web server). You will then see the Joomla 1.5 installation screen. Follow the Joomla installation on screen instructions. IMPORTANT: Be sure to click the INSTALL SAMPLE DATA button in step 6 of the installation in order to load all of the demo content into your installation.
Further Guides
RocketLauncher Installation Video TutorialLearn the steps to uploading the RocketLauncher package files to your server and installing the RocketLauncher template package by following along with the steps in this detailed video tutorial. It's now easier than ever before to deploy a replica of the RocketTheme template demo sites. Launch Video...
Uploading RocketLauncher to your RootAn in depth guide that details the steps necessary to properly upload the files from the RocketLauncher template package directly to the root of your site. This will ensure your RocketLauncher installation installs to the root of your site, and not in a subfolder. Learn more...
Publié dans
Demo Pages
Akiraka continues the chain of impressive, revolutionary, yet functional RocketTheme templates. It combines incredible styling with refined and powerful code to help your website achieve its maximum potential.
[list class=bullet-3][li] The Color Chooser
The return of the Color Chooser is upon us, but in a revolutionary, administrator only form. The Color Chooser is an ideal feature to help web developers quickly, and easily change and test the colour scheme of their sites. Akiraka has been constructed to be fully transparent and all the colours are generated by the Color Chooser, comfortably situated in the Template Manager parameters for the template. [/li] [li]
 RokCandy Component
The all new plugin from RocketTheme which allows you to implement typography easily, without fear of the WYSIWYG editor ruining your formatting and allows you, and/or your clients to add them to your content with ease. This is through a method similar to BBcode in a modern. WYSIWYG friendly syntax can be used, or even custom custom configured that will transform a set snippet to the correct HTML when it is parsed by Joomla. [/li] [li]
 RokAjaxSearch Module
RokAjaxSearch brings fantastic search functionality to Joomla, using the powerful and versatile javascript library, Mootools.
So, what does the module do? The best description is an example, simply type test in the search box in the upper right of Akiraka and wait ... and a popup shall materialise, showcasing the Joomla search results for you. [/li] [li]
 RokTabs Module
RokTabs, the fully independent and incredible flexible standalone version of the former RokSlide.
The module itself is installable into Joomla and can be easily utilised on any template, not just Akiraka. As it name implies, it is a tabbed based module to efficiently showcase your content to your visitors. [/li] [li]
 RokNavMenu Module
RokNavMenu is now an essential ingredient of RocketTheme templates. It provides various functions which are above and beyond what the mainmenu, and the subsequent template overrides can do. Therefore, a much more sophisticated menu can be constructed providing you with a much greater degree of usability. This makes the incredible advanced multiple-dropdown menu possible. It is an essential install for the integrated menu systems to operate. [/li] [li]
 Multiple Column Menu and more!
A new, multiple column dropdown feature is apparent in the template. Who needs a single dropdown column when you can have as many as you want? This feature is available for the advanced, and sophisticated RokMoomenu and the conservative, yet versatile Suckerfish. Splitmenu menus also accompany this template. [/li] [li]
 IE6 Warning Message
For the Akiraka template we included a script that will display a message to IE6 users advising them to upgrade to a more secure browser version.
This is not enabled by default, but can easily be turned on or off with a toggle in the template manager. When enabled, users visiting your site with IE6 only, will be able to view the message. By enabling this, you can help fight the good fight that rids the internet of the evil incarnation that is IE6! [/li] [li]Module Hilites
Akiraka has a range of hilites which offer diversity your module content. The hilites are light, medium, dark and ad. The contrast based hilites have different levels of transparency, producing varying opacity backgrounds. The ad hilite is a simple suffix that removes all distinctive styling, perfect for ads. [/li] [li]Stylish Typography
Akiraka includes a vast selection of professionally styled typography to bring that extra element to your content. Choose from several typography options including various bullet and number styles as well as much much more. [/li] [li]32 Module Positions
A full compliment of 32 modules allows you to showcase your content and other site elements in a flexible and differential manner for maximum effect. [/li] [/list]
Publié dans
Demo Pages
The Joomla! Community Portal is now online. There, you will find a constant source of information about the activities of contributors powering the Joomla! Project. Learn about Joomla! Events worldwide, and see if there is a Joomla! User Group nearby.
The Joomla! Community Magazine promises an interesting overview of feature articles, community accomplishments, learning topics, and project updates each month. Also, check out JoomlaConnect™. This aggregated RSS feed brings together Joomla! news from all over the world in your language. Get the latest and greatest by clicking here.
Publié dans
Latest